

The goal of this guide is to explain how to configure TorBox to use a second wireless interface (wlan1) as its primary outgoing (WAN) connection.
By default, TorBox uses the eth0 interface as its outgoing (WAN) interface. In this article, we test a different setup. We replace eth0 with wlan1. This makes the Raspberry Pi fully wireless, without any Ethernet cables. TorBox can be placed anywhere near your WiFi router and connect to it through the USB WiFi adapter.
The USB WiFi adapter provides the wlan1 interface, which acts as a wireless client. The built-in wlan0 continues to operate as the Access Point for TorBox users. Traffic from connected clients goes from wlan0 → wlan1 → Tor network.
Regarding the USB WiFi adapter, we use the TP-Link Archer TX20U Plus (AX1800). The installation of the rtl8852au driver, which is required for this adapter, was covered in a previous article. The article also introduces a useful keepalive ping script that increases WiFi stability on older Raspberry Pi 3B hardware.
Once both WiFi interfaces (wlan0 and wlan1) are available, the network diagram looks like Figure 1. The TorBox interface wlan1 receives an IP address via DHCP from the main router. In this example, the router is a MikroTik hAP ac³. Clients connecting to TorBox over wlan0 receive an IP address from the TorBox internal DHCP server from the subnet 192.168.42.0/24.

Figure 1 - TorBox as Wi-Fi client using wlan1 and acting as AP on wlan0
The best part is that we don't need to manually edit configuration files. TorBox includes an interactive configuration script /home/torbox/torbox/menu which starts automatically and guides us through the entire setup.
Note: The file /home/torbox/.profile launches the menu script every time you log in by SSH, HTTP, or console to Torbox.
1. Configuring TorBox for wlan1 as the WAN Interface
When the menu starts, navigate through the initial windows until the screen “From where is the Internet coming?” appears. Select Option 2, as shown in Figure 2. TorBox will use wlan1 to connect to the Internet.

Figure 2 - TorBox WAN interface Configuration (wlan1)
The next window explains that TorBox will reconfigure its network settings. Select Yes.
You will then be shown the two available methods for connecting TorBox to the Internet: Open Access or Captive Portal.
-
Open Access is the standard connection method at home. No login page or extra authentication is required.
-
Captive Portal is used in hotels, airports, and public WiFi. TorBox must pass through a web-based login screen before accessing the Internet.
In most cases, you should choose Open Access (Figure 3).

Figure 3 - Open Access connection mode
Next, TorBox Wireless Manager scans for available WiFi networks (Figure 4). Select your preferred SSID and press Enter. You will be asked for the WiFi password.

Figure 4 – WiFi networks detected by TorBox
After connecting to your wireless network TorBox asks whether to enable TACA (TorBox Automatic Counter Actions). TACA prevents Tor connection drops and improves stability on slower or unstable networks. Select Yes.
Tor requires the system clock to be correct. If the detected time does not match the expected UTC time, TorBox offers to adjust it automatically (Figure 5). Choose Y.

Figure 5 – TorBox time adjustment
Next, TorBox asks whether you need to enable Tor bridges (OBFS4 or Snowflake). Bridges hide Tor traffic and help users in heavily censored countries. They are slower and unnecessary if your ISP does not block Tor. Therefore, if you are not in a high-censorship country, choose NO.
Finally, TorBox establishes a Tor circuit. When the bootstrap process reaches 100%, Tor is fully operational (Figure 6). At this moment, TorBox notifies you that you can press Q to exit the setup.

Figure 6 – Tor successfully started and fully operational
2. Testing the Tor Connection with tcping.sh
To verify the stability and latency of the fully wireless Tor setup, we utilized a custom Bash script called tcping.sh. This script functions as a continuous TCP connection monitor that forces all traffic through the Tor SOCKS5 proxy (at 192.168.42.1:9050). It measures the time required to establish a connection to a target onion service (e.g., ProtonMail on port 443).
The script monitors the success rate and latency, logging all data to ./tcpstat.log. By pressing Ctrl+C, the script displays a comprehensive statistical summary of the test duration (Figure 8).
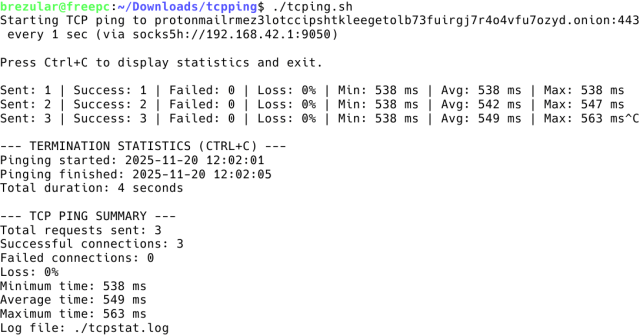
Figure 8 - Example of checking connection to Proton mail with tcping.sh
These statistics below summarize a TCP connectivity test that ran for 10 hours to a target service over the Tor network.
Test Results Summary:
The following statistics were gathered after over 10 hours of continuous monitoring:

Figure 9 - TCP Ping Summary for 10.5-Hour Tor Connectivity Test
The service exhibits the classic performance profile of a highly reliable Tor Hidden Service:
- Reliability: The service is highly available (99.31% success rate).
- Performance: The connection is slow, with high average latency (1288 ms) and very high maximum latency, which is a necessary trade-off for the anonymity provided by the Tor network.
Conclusion
In this article, we configured TorBox to operate fully wireless on a Raspberry Pi 3B using a USB WiFi adapter as the outgoing interface. The built-in wlan0 continues to serve as an Access Point, while wlan1 connects to the upstream WiFi network. Thanks to the interactive configuration tool, the entire setup is simple and requires no manual file editing.
However, older Raspberry Pi 3B boards can suffer from wireless interface freezes. For this reason, the keepalive ping workaround described earlier is recommended. It significantly improves stability and prevents long-term WiFi lockups.
With wlan1 as the WAN interface, TorBox becomes flexible, portable, and easy to place anywhere with WiFi coverage. Most importantly, this setup provides anonymous connectivity to all devices connected through wlan0 interface.