

In a previous tutorial, we configured an IPsec tunnel between a Cisco 1812 router and TheGreenBow IPsec VPN client installed on Windows OS. TheGreenBow is an excellent product; however, the free version is only valid for 30 days. Once the trial period expires, you must purchase a license to continue using it. Therefore, we will focus on configuring a free IPsec VPN client solution such as StrongSwan on Linux Debian.
The IPsec protocol for a VPN is configured using the Internet Key Exchange (IKE) protocol. The terms IPsec and IKE are used interchangeably. An IPsec VPN is also called an IKE VPN, IKEv2 VPN, XAUTH VPN, Cisco VPN or IKE/IPsec VPN.
StrongSwan is an open-source, user-space IKE implementation. IKE v1 and v2 are implemented as a user-level daemon. The IKE protocol is also encrypted. The IPsec protocol is implemented by the Linux kernel, and OpenSwan configures the kernel to add and remove VPN tunnel configurations.
The network topology is depicted in Figure 1. The StrongSwan client is the initiator, and the responder is the Cisco 1812. However, OpenSwan does not use the terms "source" and "destination" or "server" and "client" because IKE/IPsec are peer-to-peer protocols. Instead, it uses the terms "left" and "right" to refer to the endpoints (the hosts). This also allows you to use the same configuration on both endpoints in most cases. However, administrators usually choose to always use "left" for the local host and "right" for the remote host. [1].
Left :
- strongSwan 5.9.1 installed on Debian bullseye 11
Right:
- Cisco 1812 IOS Version 15.1(4)M12a

Figure 1 - Network Topology
1. IPSec "Right" Configuration - Cisco 1812
The initial IPsec tunnel configuration on the Cisco 1812 (left side) is found in R1-config.txt. The Cisco router has assigned a dynamic public IP address (95.103.161.130), which is translated to 'a102.mywire.org'. However, this dynamic IP can change after each router restart. For this reason, we rely on the domain name instead of the IP address in strongSwan configuration. Therefore, the "right" parameter configured in ipsec.conf is the domain name a102.mywire.org and not the IP address 95.103.161.130.
By default, Cisco uses the IP address of the interface for the identity in the IKE phase. The right side (StrongSwan) receives the IDir '95.103.161.130' from the Cisco router, but it does not match the hostname 'a102.mywire.org'. As a result, Phase 1 is not successful, and the IPsec tunnel is not established, as shown in Figure 2.

Figure 2 - Local and Remote ID Mismatch types in IKEV1
For this reason, we need to ensure that the hostname is set to 'a102' and the domain name is set to 'mywire.org' in Cisco configuration.
a102(config)# hostname a102
a102(config)# ip domain name mywire.org
Furthermore, we need to configure router to use hostname to identify itself in the Phase 1:
a102(config)# crypto isakmp identity hostname
The complete Cisco IPsec "right side" configuration with omitted credentials is R1-final-ipsec.txt.
2. strongSwan Installation
To install strongSwan and the necessary plugins, run:
$ sudo apt install strongswan libcharon-extra-plugins
Then, enable the strongSwan service and start it using the following commands:
$ sudo systemctl enable strongswan-starter && sudo systemctl start strongswan-starter
3. IPSec "Left" Configuration - StrongSwan
When configuring IPSec with StrongSwan, we typically need to modify two main files - /etc/ipsec.conf and /etc/ipsec.secrets.
- /etc/ipsec.conf: This file is the main configuration file for strongSwan. It contains the configuration settings for IPSec connections, policies, and other options. In this file, we define various aspects of your IPSec setup, including connections, encryption settings, authentication methods, and more. Each section in this file corresponds to a specific IPSec connection or a global configuration setting.
- /etc/ipsec.secrets: This file contains sensitive information such as pre-shared keys (PSKs) or private keys used for authentication in IPSec connections. StrongSwan requires this file to securely store secrets used during IPSec negotiation. It is crucial to protect this file's permissions to prevent unauthorized access to sensitive information.
3.1 IPsec.conf Configuration
This configuration sets up a connection named "cicos1812" with the specified settings. You can add more customize other connection-specific settings as needed. To obtain more details about parameters in IPsec.conf, read man for ipsec.conf (man ipsec.conf).
Edit /etc/ipsec.conf file and insert the following code to it:
$ sudo vi /etc/ipsec.conf
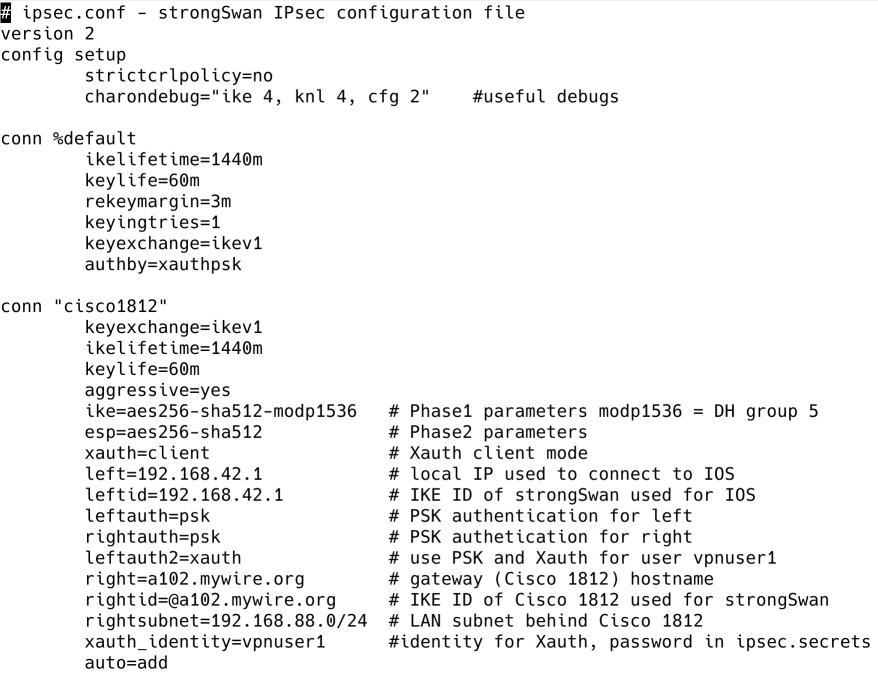
Figure 3 - File /etc/ipsec.conf
3.2 IPsec.secret Configuration
This file holds shared secrets for authentication. Edit /etc/ipsec.conf file and insert the following code to it:
$ sudo vi /etc/ipsec.secrets

4. Opening IPsec Tunnel and Checking IPsec Status
4.1 Bringing Up IPsec tunnel
To bring up the IPsec tunnel 'cisco1812' use the command bellow in Linux. This command initiates the Aggressive Mode IKE_SA with the specified connection name, in this case, "cisco1812". It negotiates the IPSec connection parameters with the remote peer and establishes the tunnel. The output displays the negotiation process, including the selected cryptographic proposals and the establishment of the IPSec Security Associations (SAs).
root@debian11:/home/debian# ipsec up cisco1812
initiating Aggressive Mode IKE_SA cisco1812[6] to 95.103.161.130
generating AGGRESSIVE request 0 [ SA KE No ID V V V V V ]
sending packet: from 192.168.42.1[500] to 95.103.161.130[500] (496 bytes)
received packet: from 95.103.161.130[500] to 192.168.42.1[500] (627 bytes)
parsed AGGRESSIVE response 0 [ SA V V V V V KE ID No HASH NAT-D NAT-D ]
received Cisco Unity vendor ID
received DPD vendor ID
received unknown vendor ID: 0f:7c:09:49:6b:67:b0:d3:0f:81:bf:a5:91:5f:d8:28
received XAuth vendor ID
received NAT-T (RFC 3947) vendor ID
selected proposal: IKE:AES_CBC_256/HMAC_SHA2_512_256/PRF_HMAC_SHA2_512/MODP_1536
local host is behind NAT, sending keep alives
generating AGGRESSIVE request 0 [ HASH NAT-D NAT-D ]
sending packet: from 192.168.42.1[4500] to 95.103.161.130[4500] (236 bytes)
received packet: from 95.103.161.130[4500] to 192.168.42.1[4500] (124 bytes)
parsed TRANSACTION request 2643196181 [ HASH CPRQ(X_USER X_PWD) ]
generating TRANSACTION response 2643196181 [ HASH CPRP(X_USER X_PWD) ]
sending packet: from 192.168.42.1[4500] to 95.103.161.130[4500] (140 bytes)
received packet: from 95.103.161.130[4500] to 192.168.42.1[4500] (124 bytes)
parsed TRANSACTION request 3961229093 [ HASH CPS(X_STATUS) ]
XAuth authentication of 'vpnuser1' (myself) successful
IKE_SA cisco1812[6] established between 192.168.42.1[192.168.42.1]...95.103.161.130[a102.mywire.org]
scheduling reauthentication in 86160s
maximum IKE_SA lifetime 86340s
generating TRANSACTION response 3961229093 [ HASH CPA(X_STATUS) ]
sending packet: from 192.168.42.1[4500] to 95.103.161.130[4500] (124 bytes)
generating QUICK_MODE request 1327357349 [ HASH SA No ID ID ]
sending packet: from 192.168.42.1[4500] to 95.103.161.130[4500] (268 bytes)
received packet: from 95.103.161.130[4500] to 192.168.42.1[4500] (236 bytes)
parsed QUICK_MODE response 1327357349 [ HASH SA No ID ID N((24576)) ]
selected proposal: ESP:AES_CBC_256/HMAC_SHA2_512_256/NO_EXT_SEQ
CHILD_SA cisco1812{2} established with SPIs c3fd7731_i 9af8961d_o and TS 192.168.42.1/32 === 192.168.88.0/24
generating QUICK_MODE request 1327357349 [ HASH ]
sending packet: from 192.168.42.1[4500] to 95.103.161.130[4500] (108 bytes)
connection 'cisco1812' established successfully
4.2 Checking IPsec Status
To check status of IPsec tunnel on left side (StrongSwan), enter the command below. The command provides a summary of the current IPsec Security Associations (SAs). It shows the established connections, their status, and the involved endpoints and traffic selectors.
root@debian11:/home/debian# ipsec status
Security Associations (1 up, 0 connecting):
cisco1812[6]: ESTABLISHED 3 minutes ago, 192.168.42.1[192.168.42.1]...95.103.161.130[a102.mywire.org]
cisco1812{2}: INSTALLED, TUNNEL, reqid 1, ESP in UDP SPIs: c3fd7731_i 9af8961d_o
cisco1812{2}: 192.168.42.1/32 === 192.168.88.0/24
4.3 Checking IPsec All Parameters
The command 'ipsec statusall' provides more detailed information about the IKE daemon (charon) and all active IPsec connections. It includes uptime, memory usage, loaded plugins, listening IP addresses, connection details etc.
root@debian11:/home/debian# ipsec statusall
Status of IKE charon daemon (strongSwan 5.9.1, Linux 5.10.0-29-amd64, x86_64):
uptime: 2 hours, since May 24 23:51:51 2024
malloc: sbrk 2969600, mmap 0, used 916048, free 2053552
worker threads: 11 of 16 idle, 5/0/0/0 working, job queue: 0/0/0/0, scheduled: 5
loaded plugins: charon aesni aes rc2 sha2 sha1 md5 mgf1 random nonce x509 revocation constraints pubkey pkcs1 pkcs7 pkcs8 pkcs12 pgp dnskey sshkey pem openssl fips-prf gmp agent xcbc hmac gcm drbg attr kernel-netlink resolve socket-default connmark farp stroke updown eap-identity eap-aka eap-md5 eap-gtc eap-mschapv2 eap-radius eap-tls eap-ttls eap-tnc xauth-generic xauth-eap xauth-pam tnc-tnccs dhcp lookip error-notify certexpire led addrblock unity counters
Listening IP addresses:
192.168.42.1
Connections:
cisco1812: 192.168.42.1...a102.mywire.org IKEv1 Aggressive
cisco1812: local: [192.168.42.1] uses pre-shared key authentication
cisco1812: local: [192.168.42.1] uses XAuth authentication: any with XAuth identity 'vpnuser1'
cisco1812: remote: [a102.mywire.org] uses pre-shared key authentication
cisco1812: child: dynamic === 192.168.88.0/24 TUNNEL
Security Associations (1 up, 0 connecting):
cisco1812[6]: ESTABLISHED 4 minutes ago, 192.168.42.1[192.168.42.1]...95.103.161.130[a102.mywire.org]
cisco1812[6]: IKEv1 SPIs: 4cdd54bce6e4e709_i* fabbae546b66b0d3_r, pre-shared key+XAuth reauthentication in 23 hours
cisco1812[6]: IKE proposal: AES_CBC_256/HMAC_SHA2_512_256/PRF_HMAC_SHA2_512/MODP_1536
cisco1812{2}: INSTALLED, TUNNEL, reqid 1, ESP in UDP SPIs: c3fd7731_i 9af8961d_o
cisco1812{2}: AES_CBC_256/HMAC_SHA2_512_256, 0 bytes_i, 0 bytes_o, rekeying in 50 minutes
cisco1812{2}: 192.168.42.1/32 === 192.168.88.0/24
4.4 Bringing Down IPsec Tunnel
To close the IPsec tunnel enter the command below. The command closes the specified IPsec connection, terminating the IPSec Security Associations (SAs) and the IKE_SA. It sends the necessary DELETE messages to the remote peer to properly close the connection.
root@debian11:/home/debian# ipsec down cisco1812
closing CHILD_SA cisco1812{2} with SPIs c3fd7731_i (0 bytes) 9af8961d_o (0 bytes) and TS 192.168.42.1/32 === 192.168.88.0/24
sending DELETE for ESP CHILD_SA with SPI c3fd7731
generating INFORMATIONAL_V1 request 1442320517 [ HASH D ]
sending packet: from 192.168.42.1[4500] to 95.103.161.130[4500] (124 bytes)
deleting IKE_SA cisco1812[6] between 192.168.42.1[192.168.42.1]...95.103.161.130[a102.mywire.org]
sending DELETE for IKE_SA cisco1812[6]
generating INFORMATIONAL_V1 request 3190336075 [ HASH D ]
sending packet: from 192.168.42.1[4500] to 95.103.161.130[4500] (140 bytes)
IKE_SA [6] closed successfully
Conclusion
In this tutorial, we set up an IPsec tunnel between a Cisco 1812 router and a Linux Debian system running StrongSwan. This choice was prompted by the trial limitations of TheGreenBow IPsec VPN client. We configured both sides of the tunnel, addressing issues like identity mismatch. After establishing the tunnel, we verified its status and learned how to terminate it gracefully. This tutorial equips us to deploy and manage IPsec VPN connections using StrongSwan on Linux Debian.