
eNSP stands for for Enterprise Network Simulation Platform and it is program that simulates Huawei routers. This network simulator is similar to Cisco Packet Tracert but it offers one big advantage comparing to Packet Tracert. eNSP allows to connect simulated routers to any other network devices running outside sNSP. This job can be done using either UDP tunnels or bridging routers to the Ethernet cards presented in OS on which is eNSP installed.
The tutorial shows the necessary steps required for connecting Huawei router running inside eNSP to a Cisco router running inside GNS3. As I prefer Linux to any other OS, GNS3 is installed on Fedora Linux. During testing eNSP I had to deal with two major issues. First of all, it is no eNSP version witten for Linux. However the issue can be overcome by VirtualBox with Windows installed on Vbox virtual machine. The second issue is the strange UDP tunnels implementation in eNSP that prevents UDP tunnels working with GNS3. For this reason I decided to use bridging approach as a workaround. In the future if UDP tunnels were properly implemented it would be probably easier to use UDP tunnels instead of bridging. In this scenario the only required bridging task would be bridging VirtualBox Ethernet card with host OS bridge. Connection between two end nodes - GNS3 router and Huawei router - would be solved by UDP tunnels.
You can read more about UDP tunnels implementation problem here.
1. Prerequisites
1.1 Host system
- Fedora 17 Linux kernel 3.8.3-103.fc17.x86_64
- GNS3 0.8.4 RC2 with Cisco IOS version 15.1(4)M2 for Cisco 7206VXR
- Dynamips emulation software version 0.2.8-RC3-x86
- VirtualBox 4.2.10
- software for bridging - bridge-utils-1.5-3.fc17.x86_64
- software for creating virtual tap interface on fedora - tunctl-1.5-6.fc17.x86_64
1.2 Guest system
- Windows 7 32 bit installed on VirtualBox machine
- eNSP version v1.0.216 installed on Windows
1.3 Physical topology

Picture 1 - Physical connection - click image to enlarge
As you can see both routers interfaces are connected to virtual interfaces. The Cisco router is connected to tap0 and Huawei router to MS loopback interface. The virtual interfaces are connected to virtual bridges that are created in Linux and Windows respectively. Bridges are represented by switch icons in a topology. A function of virtual bridge is to connect a virtual interface with hardware based Ethernet interface.
1.4 Logical topology

Picture 2 - Logical Connection
2. Linux Part
In this part we are going to create a virtual tap interface and a bridge interface on Fedora Linux. Once the bridge is created, Ethernet interface p3p1 and tap interface can be added to the bridge. The exact steps for configuration bridge on Fedora Linux are described here:
Note Instead of the Ethernet interface eth0 use and actual interface presented in your system. In my case the interface name is p3p1.
Once you finished the steps 1-5, skip a step 6 and assign the following IP address to the interface p3p1:
sudo ifconfig virbr0 192.168.0.100/24
You can also configure the default gateway IP address. In my network it is a router with the IP address 192.168.0.1
sudo route add default gw 192.168.0.1
Now you can continue with step 7 - disabling Ethernet filtering. It is the last step, as we are going to use VirtualBox to run Windows instead of Qemu.
3. GNS3 Part
3.1 Cloud configuration
In GNS3, move a cloud device from the left panel to the GNS3 desktop. The cloud device bridges GNS3 router to the host system - Fedora. In the cloud settings navigate to NIO TAP tab. Add a new interface tap0 as it is shown at the picture.

Picture 3 - Adding Interface tap0 to Cloud Configuration
3.2 Connecting Cisco router to cloud and router configuration
The connection is shown at the picture. For Cisco 7206VXR you should add Ethernet module to the router first.

Picture 4 - Connecting Cisco 7206VXR Using Cloud Device
Configure IP address 192.168.0.150/24 for the interface GigabitEthernet0/0. Once you finished you should be able to ping IP address of Linux virbr0 interface - 192.168.0.100

Picture 5 - Cisco Router Configuration
After configuration of the static default route you should be able to ping devices on the Internet as well.

Picture 6 - Pinging Google IP address - 4.2.2.2
4. VirtualBox part
This is the most largest part of this How-to containing the following tasks.
4.1 Creating a new Guest Vbox machine and installing Windows 7 on VM
Windows installation on VirtuaBox virtual machine is not shown. It is described in more details here (step 2).
To copy a Huawei installation exe file from the host system - Fedora to the guest system - Windows read the steps 3.2 and 3.3 of the tutorial.
4.2 Configuring VirtualBox for bridging support
Once you are finished with Windows installation, shutdown Windows. On the left panel of VirtualBox manager is presented a virtual machine you previously created in step 4.1. Left click on this machine and select options Settings. Navigate to option Network and switch to the Adapter 1 tab. Configure Adapter 1 settings as following.

Picture 7 - Bridging Adapter1 of Guest OS - Windows with Interface virbr0
After configuration the first VirtualBox Ethernet card is bridged with Linux Fedora bridge - interface virbr0.
4.3 Huawei eNSP, Wireshark, WinPcap installation
Now you can start your VBox machine. Once Windows boots up eNSP installation file should be attached to CDROM. Left click on the file and select an option Run as administrator. You will be prmpted to install also WinPcap and Wireshark that are needed if packet sniffing is required.

Picture 8 - WinPcap and Wireshark Installation
4.4 Creating a MS loopback interface and virtual bridge in Windows
In order to connect Huawei instance to the Ethernet interface presented in Windows we have to create Microsoft loopback interface and bridge both interfaces together. A new device - bridge will be automatically created and containing attached both - MS loopback and Ethernet interfaces.
a) Microsoft loopback device installation
Click the Start menu and search for cmd. Right-click on cmd and select Run as Administrator. Enter keyword hdwwiz.exe.
In the Welcome to the Add Hardware Wizard, click Next. Select Install the hardware that I manually select from a list (Advanced) and click Next. Scroll down and select Network adapters and click Next. Select under Manufacturer Microsoft and then under Network Adapter Microsoft Loopback Adapter and click Next.
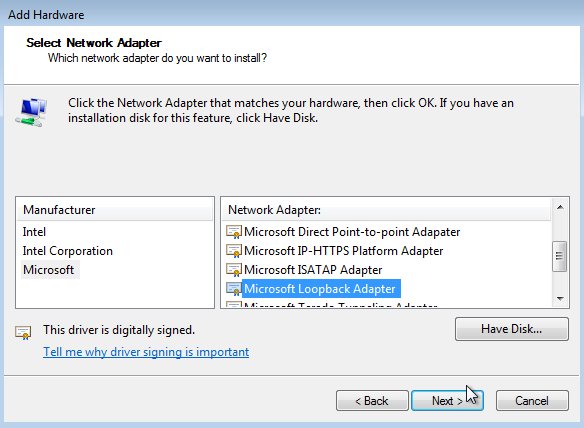
Picture 9 - MS Loopback Adapter Installation
b) Bridging MS loopback and Ethernet interface
Navigate to Start-> Control Panel-> View Network status and tasks-> Change adapter settings. A new created loopback interface should be presented. Mark both interfaces and click on them with the left mouse button. Select option Bridge connections.

Picture 10 - Bridging MS Loopback Adapter and Ethernet Interface
A new device - bridge should be created as it is shown on the picture. Assign IP address 192.168.0.200/24 to the bridge.
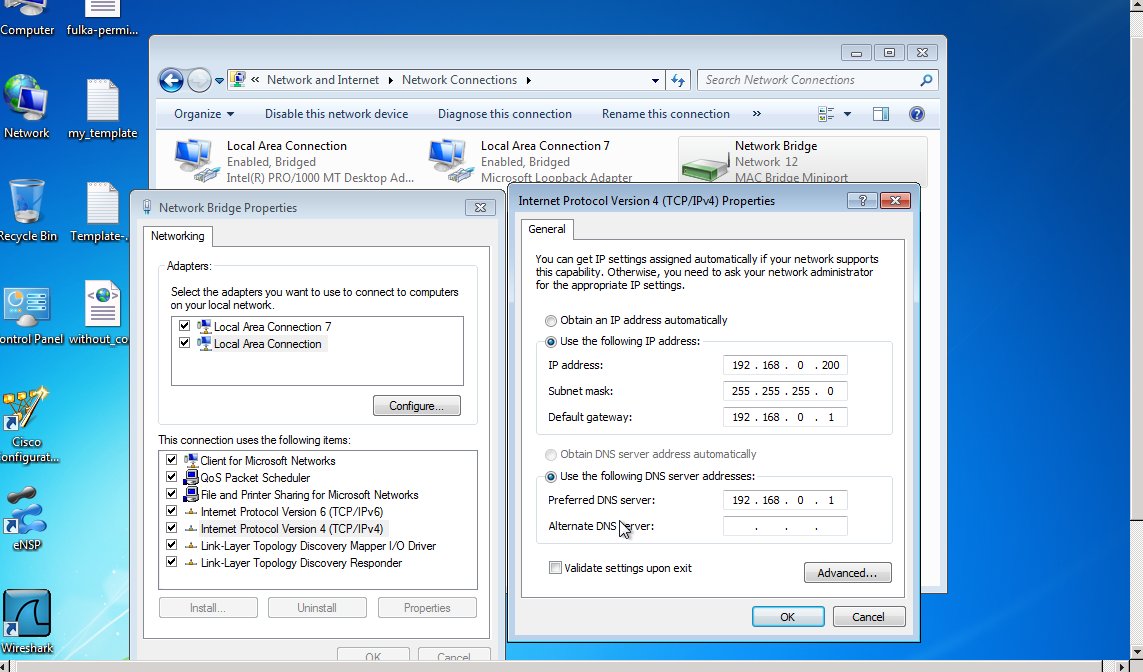
Picture 11 - IP Address Configuration for Bridge Device
You should be able to ping bridge IP address 192.168.0.200 from the router 7206VXR ge0/0 interface.
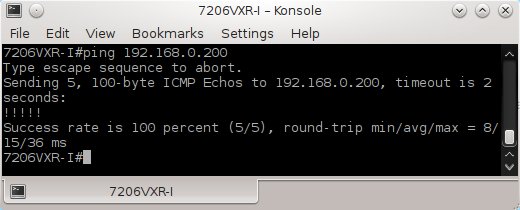
Picture 12 - Pinging Windows Bridge IP Address from Cisco 7206VXR
5. Huawei Part
5.1 Binding Huawei router interface with the Windows loopback interface
Launch Huawei eNSP and drag & drop router to eNSP desktop. Left click on the router and select option Settings. Bind Huawei router's interface Ethernet0/0/0 with the MS loopback interface as it is shown at the picture.
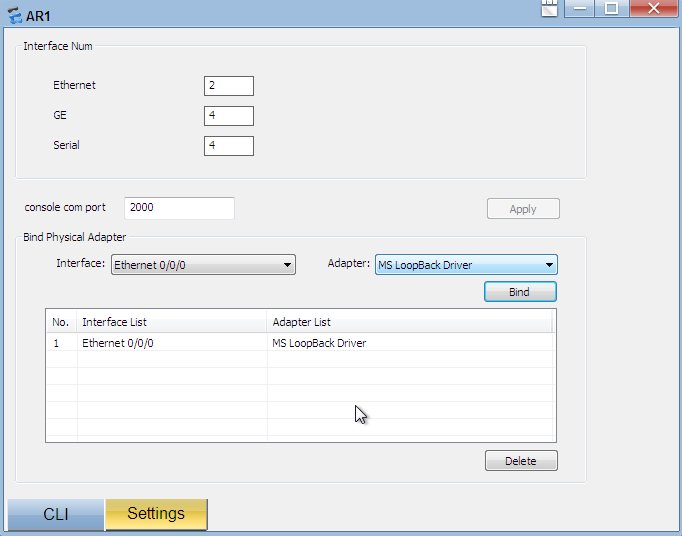
Picture 13 - Binding Huawei Ethernet0/0/0 with MS Loopback Interface
Note If the loopback interface or bridge is not available in the list of Adapters, restart Windows and launch Settings option again.
5.2 Huawei router configuration
Start a router and select CLI option. Configure IP address 192.168.0.250/24 for the interface Ethernet0/0/0.

Picture 14 - IP Address Configuration on Huawei
You should be able to ping IP address 192.168.0.100 of Linux bridge from Huawei CLI and IP address 192.168.0.150 assigned to Cisco 7206VXR as well. Configuring a static default route pointing to the default gateway IP address 192.168.0.1 you connect your Huawei to the Internet.
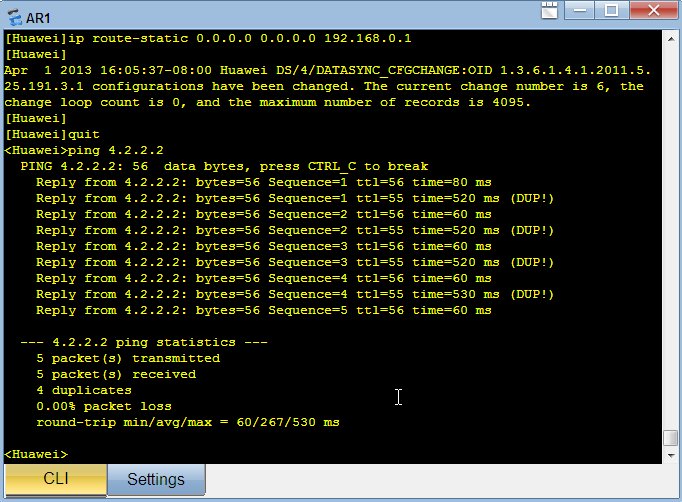
Picture 15 - Static Default Route Configuration on Huawei Router
End.
Reference
http://lifeoflogs.blogspot.com/2011/04/cisco-vs-huawei-essential-command.html
http://social.technet.microsoft.com/Forums/en-US/w7itpronetworking/thread/259c7ef2-3770-4212-8fca-c58936979851/
I registered on the Huawei site to download this.
I was unable to download the latest version eNSP_V100R002C00B300_Setup.zip - the website seemed to be stuck in a redirect loop. It did let me download eNSP_V100R002C00B200_Setup.zip, which I installed. When I ran this B200 version it offerend me the B300 version and sent me to a download page, asked me for my Huawei credentials then downloaded successfully!
Huawei suggest installing some kind of Download manager, either FlashGet or NetAnts. I don't like the look of either of those so stick with the direct download.
This looks like an excellent simulator!
pls can i get ensp software for ubuntu os (linux os)????