
I would like show how to run Linux Multilayer Switch - LiSA in GNS3. LISA was created by Romanian developers and according to their words:
LiSA , short for Linux Switching Appliance, is an open-source software project built for the GNU/Linux operating system that aims to provide its users with all the necessary instruments for implementing and maintaining an e efficient and reliable switching solution at a low cost.
The project was designed to be used in medium and small-sized networks. As opposed to usual hardware-driven implementations, LiSA offers a software approach to switching by utilizing the Linux Kernel networking stack and adding its own switch-speci c functionality.
Since LiSA is practically a software implementation of what normally is a hardware-based logic, it might seem that there is no advantage in using it. On the contrary, LiSA provides several bene ts that hardware implementations do not have.
Many of these advantages stem from the fact that it is based on the Linux operating system.
First of all this means it is not tied to a speci c hardware architecture. It is only limited to the architectures supported by Linux, of which we mention : ARM, x86, MIPS, PowerPC and many more.
Secondly, it is not dependent on the network hardware. As long as there is a Linux device driver for the speci c NIC which LiSA is supposed to handle, no problems will be encountered.
Finally, Linux is well-known for its ability to run well on older systems and on embedded devices, that is, devices that have important resource constraints. This provides an advantage since one of LiSA's main objectives is to run on such devices.The project will not compete with Cisco (we could not do that anyway :P) but should provide a cost-effective advanced-featured solution for small networks.
LiSA can do both L2 and L3 switching and configuration is similar to Cisco IOS.
Documentation
http://lisa.mindbit.ro/download/lisa/doc/lisa-roedu-paper.pdf
LISA installation
I created Qemu image with CentOS Linux and LISA installed above it. I used pre-built rpm packages from the LISA Project but you can compile them by your own.
1. Download Centos 6.3
$ wget http://ftp.sh.cvut.cz/MIRRORS/centos/6.3/isos/i386/CentOS-6.3-i386-minimal.iso -P ~/Downloads/
2. Create Qemu base image
$ /usr/local/bin/qemu-img create -f qcow2 ./lisa-2.0.2-centos-6.3.img 3G
3. Install Centos 6.3 on Qemu image
$ /usr/local/bin/qemu -m 512 -boot d -hda lisa-2.0.2-centos-6.3.img -cdrom ./Downloads/CentOS-6.3-i386-minimal.iso
- Choose Install or upgrade an existing system
- Select OK to start checking installation media and after finish select Continue
- Choose Language to use during installation - English
- Choose Keyboard attached to the computer - us
- Once message Error processing drive appears, select option Re-initialize
- Set your time zone - Europe/Bratislava
- Set password - it must be at least 6 characters - password
- Select - Use entire drive
- Choose Write changes to disk
4. Start qemu instance
$ /usr/local/bin/qemu -m 512 -boot c -hda lisa-2.0.2-centos-6.3.img
Login to Centos 6.3 with root account - use password you set during installation process.
5. Setup Centos network settings and install wget package
$ dhclient eth0
$ yum install wget
6. Download and install patched kernel 2.6.32-279.9.1 and kernel-devel to Qemu instance
a) Download necessary kernel packages
$ wget http://lisa.mindbit.ro/download/lisa/rpm/centos/6/kernel-2.6.32-279.9.1.el6.lisa2.0.1/kernel-2.6.32-279.9.1.el6.lisa2.0.1.build3.i686.rpm
$ wget http://lisa.mindbit.ro/download/lisa/rpm/centos/6/kernel-2.6.32-279.9.1.el6.lisa2.0.1/kernel-devel-2.6.32-279.9.1.el6.lisa2.0.1.build3.i686.rpm
$ wget http://lisa.mindbit.ro/download/lisa/rpm/centos/6/kernel-2.6.32-279.9.1.el6.lisa2.0.1/kernel-firmware-2.6.32-279.9.1.el6.lisa2.0.1.build3.i686.rpm
$ wget http://lisa.mindbit.ro/download/lisa/rpm/centos/6/kernel-2.6.32-279.9.1.el6.lisa2.0.1/kernel-headers-2.6.32-279.9.1.el6.lisa2.0.1.build3.i686.rpm
b) Install kernel packages
$ sudo rpm -ihv kernel-firmware-2.6.32-279.9.1.el6.lisa2.0.1.build3.i686.rpm
$ sudo rpm -ihv kernel-2.6.32-279.9.1.el6.lisa2.0.1.build3.i686.rpm
$ sudo rpm -ihv kernel-devel-2.6.32-279.9.1.el6.lisa2.0.1.build3.i686.rpm
$ sudo rpm -ihv kernel-headers-2.6.32-279.9.1.el6.lisa2.0.1.build3.i686.rpm
7. Edit bootloader config file - the grub.conf
I assume you are familiar with vi editor. If not read this manual.
$ sudo vi /etc/grub.conf
- Comment the lines with 2.6.32-279 kernel (use character #)
- Comment the line starting with "hiddenmenu"
- Comment the line starting with "splashimage"
- Set timeout to 2 (default is 5 seconds)
$ sudo reboot
Uninstall package kernel-firmware-2.6.32-279.el6.noarch.
$ sudo rpm -e kernel-firmware-2.6.32-279.el6.noarch
8. Download and install Lisa files
a) Download necessary LISA packages
$ sudo dhclient eth0
$ wget http://lisa.mindbit.ro/download/lisa/rpm/centos/6/lisa-2.0.1_2.6.32-1.el6/liblisa-2.0.1_2.6.32-1.el6.i686.rpm
$ wget http://lisa.mindbit.ro/download/lisa/rpm/centos/6/lisa-2.0.1_2.6.32-1.el6/lisa-2.0.1_2.6.32-$ 1.el6.i686.rpm
$ wget http://lisa.mindbit.ro/download/lisa/rpm/centos/6/lisa-2.0.1_2.6.32-1.el6/lisa-debuginfo-2.0.1_2.6.32-1.el6.i686.rpm
b) Install LISA packages
$ sudo rpm -ihv liblisa-2.0.1_2.6.32-1.el6.i686.rpm
$ sudo rpm -ihv lisa-2.0.1_2.6.32-1.el6.i686.rpm
$ sudo rpm -ihv lisa-debuginfo-2.0.1_2.6.32-1.el6.i686.rpm
9. Disable selinux and iptables
$ sudo vi /etc/selinux/config
SELINUX=disabled
Now disable ipv6 and ipv4 iptables.
$ sudo /etc/init.d/ip6tables save
$ sudo /etc/init.d/ip6tables stop
$ sudo chkconfig --level 345 ip6tables off
10. Enable permanent IP forwarding
Edit file /etc/sysctl.conf with vim and set ipv4 and ipv6 forwarding to 1.
$ sudo vi /etc/sysctl.conf
net.ipv4.ip_forward = 1
net.ipv6.conf.all.forwarding = 1
Restart network service:
$ sudo service network restart
11. Change default behaviour of Ethernet interface when MAC address changes
Once the MAC address of Ethernet interface changes, system does not change MAC address for this interface. Instead of this, it keeps the pair – interface name and MAC address unchanged. In this case, a completely new pair - interface name and MAC address is created. It is acceptable behaviour but it can causes interfaces mismatch when the new MAC addresses are generated. Unfortunately, GNS3 Qemuwrapper script is programmed to generate a new MAC address for interface every time is Qemu image started. To avoid it we have to make some changes.
Add the following line to the file /lib/udev/rules.d/75-persistent-net-generator.rules right after the line ENV{MATCHIFTYPE}="$attr{type}"
ENV{MATCHADDR}=="*", ENV{MATCHADDR}=""
Edit /etc/sysconfig/network-scripts/ifcfg-eth0 and delete the line starting with the word HWADDR.
12. Create a network script to avoid Ethernet card requesting IP adress from DHCP server
Let's say we have two Ethernet interfaces presented in the system. If we want to speed up boot of CentOS create a network script for each Ethernet as following.
Interface Ethernet0:
# vi /etc/sysconfig/network-scripts/ifcfg-eth0
DEVICE=eth0
BOOTPROTO=static
ONBOOT=yes
Interface Ethernet1:
# vi /etc/sysconfig/network-scripts/ifcfg-eth1
DEVICE=eth1
BOOTPROTO=static
ONBOOT=yes
13. Configure LISA to redirect output to a serial port
CentOS can be configured to send output to the serial port instead of VGA port.
a) Edit /etc/inittab and add the line to allow agetty daemon to listen on serial port ttyS0
# vi /etc/inittab
s0:2345:respawn:/sbin/agetty -L /etc/issueserial 38400 ttyS0 vt100
b) Create the file /etc/issueserial to show serial port number, line speed and the number of logged users
# vi /etc/issueserial
Welcome to LISA 2.0.1
You are connected on l at b bps
U
c) Activate changes in /etc/inittab
$ sudo init q
This forces the init process to re-read the configuration file.
d) Edit /etc/securetty and add ttyS0 to allow root user login via serial console
# vi /etc/securetty
ttyS0
e) Edit /etc/grub.conf to redirect output to serial port /dev/ttyS0 during boot
Modify line starting with the word kernel and add parameter console=ttyS0,38400.
# vi /etc/grub.conf
kernel /vmlinuz-2.6.32-279.9.1.el6.lisa2.0.1.build3.i686 ro root=/dev/maa
pper/VolGroup-lv_root rd_NO_LUKS LANG=en_US.UTF-8 rd_NO_MD rd_LVM_LV=VolGroup/lvv
_swap SYSFONT=latarcyrheb-sun16 crashkernel=auto rd_LVM_LV=VolGroup/lv_root KEYY
BOARDTYPE=pc KEYTABLE=us rd_NO_DM rhgb quiet console=ttyS0,38400
Halt the image and start Qemu as following:
$ /usr/local/bin/qemu -m 512 -boot c -hda lisa-2.0.2-centos-6.3.img -serial telnet:127.0.0.1:3000,server,nowait
Telnet to IP address 127.0.0.1 port 3000. You should be able to watch the whole booting process.
$ telnet 127.0.0.1 3000
Reference
http://www.vanemery.com/Linux/Serial/serial-console.html
14. Delete temporary files and command history
$ sudo rm ./kernel-*; rm ./liblisa-*; rm lisa*
# echo > /root/.bash_history
15. Configure Qemu host settings in GNS3
Qemu Image: set path to the file lisa-2.0.2-centos-6.3.img
RAM: 256 MB
NIC: rtl8139
Enable option KVM only if you use Linux and your CPU supports KVM. Read more about KVM installation here.
16. Networking
Place Qemu host icon on GNS3 desktop and start it. Login to Centos with root account. To get switch console just type command swcli. Configuration is Cisco like so you shouldn't have problem to setup Vlans, trunks, access ports etc. Compare to real Cisco switch you need to define ethernet interfaces in a configuration mode.
S(config)# interface Ethernet 0
S(config-if)#exit
Notice that interface Ethernet 0 is now available for use in running-config. Do the same for all interfaces you want to use for switching.
17. Bugs and Issues
a) Qemu hangs up if you remove vlan interface with "no inteface vlan XY"
In this case shutdown switch from GNS3 panel and use vim to edit lisa configuration file /etc/lisa/config.text". Delete line with interface vlan command and reboot LiSA with reload command from switch cli.
b) Kernel disables IRQ 10 randomly
Ethernet card using IRQ stops forwarding traffic. Check the screenshot below.

Picture 1 - Disabling IRQ 10
In this case issue shutdown and no shutdown command under particular interface of switch CLI or anothe option is to issue "ifconfig ethx down" and "ifconfig ethx up" commands from CentOS CLI.
c) VLAN trunking is not working between two LISA Qemu / VirtualBox instances
According to a LiSA developers Radu Rendec, the issue is related to hardware acceleration of VLAN untagging. When the NIC supports such acceleration, frames are already untagged at the time when they come out of the NIC driver. Because right now there is no support for this in LiSA, LiSA cannot properly handle these frames and they get "lost". Since centos 6.3 has no support for "rxvlan" in ethtool (actually there is no kernel support for this in 2.6.32), the workaround for this is to use another type of NIC, which does not support hardware acceleration of VLAN untagging.
I created a simple testing topology with two LiSA Qemu / Vbox instances connected via their eth0 interfaces configured as trunk ports with vlans 1 and 100 allowed. Two Qemu / VirtualBox Microcore PCs are connected to the particular eth1 interface that is configured as the switchports with access in VLAN 100.
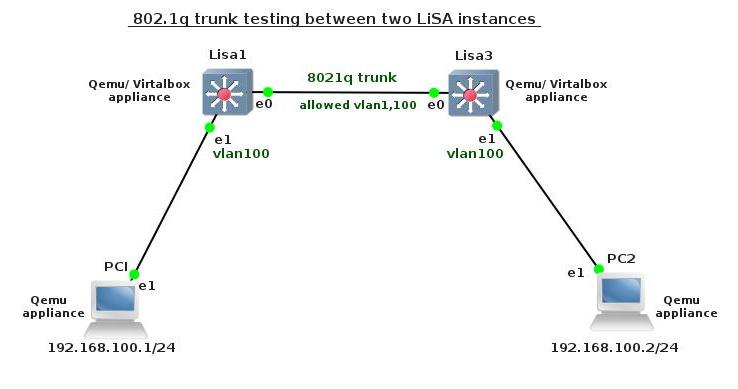
Picture 2 - Topology for trunk testing between LiSA Qemu Instances
I tested all the available network cards emulated by Qemu and VirtualBox with the following result.

Picture 3 - Qemu and VirtualBox Ethernet Card Test Results
d) L3 connectivity is not working between two LiSa Qemu / VirtualBox instances due to the same MAC addresses generated on their virtual VLAN interfaces
First of all, you should choose proper network card that supports trunking. The list of network cards that support transmission of frames containing 802.1Q header is listed in a paragraph 17 c). The next step is to configure virtual VLAN interfaces on LiSA switch. However, the MAC address of particular virtual interface is the same for all LiSA switches in your topology. Scenarios where "layer 3" connectivity is not involved and only tagged traffic transmission is required via trunk ports are not affected by this issue. However, once the virtual interfaces are created with command "interface vlan NNN" and IP address is assigned on this interface, the additional step is required as a workaround in order to get "layer 3" functionality working on LiSA switch.
Workaround
Create a new config file for LiSA and specify the vif_mac parameter. You can do this with following command.
# echo "options switch vif_mac=02:00:11:22:33:40" > /etc/modprobe.d/lisa.conf
Once you do it, reload LiSA service with the command:
$ sudo /etc/init.d/lisa restart
As you can notice the new MAC addresses 02:00:11:22:33:XX is generated for all virtual VLAN interfaces with the last hexa numbers XX unique for a particular virtual interface. The new MAC addresses are kept after restart as well.
18. Testing
I created GNS3 project to show configuration and functionality of LISA switch. A video showing configuration is here:
 Picture 4 - Testing Topology (click image to enlarge)
19. Download
You can download Qemu and VirtualBox images from here.
Login/password: root/password
End.
what is the passworf for login into lisa switch
Login/password: root/password
please what is the su password
root/password
Thanks
it works
it very gud but it don't support all function of layer 3 switch and there is less command than packet tracer so if u hav any othere idea of all suntion of switching plz reply me on fareed_khan79@yahoo.com thanks
they are several options:
a) router 3725 with NM-16SW emulated by Dynamips
b) IOU l2 - Linux or Solaris version
Hi
i want to ask can i run LISA on a Real Computer with Muliplte switching NICs, otherwise can anyone show how to install on VirtualBox
Thanks
You can run LISA on x86 architecture. Use either VirtualBox/Qemu or real hardware. The last summer I installed CenOS and built a Quagga with Openvswitch on old PIII with 1GB RAM. You can read about it in my how-to.
hy...and thank you for your work.
is ip routing enabled by default on lisa?
I have created the svi's 10 and 20, but lisa is not routing between the two vlans
not sure if routing is enabled by default on LiSA. Check a routing table with show ip route command. And don't forget to enable routing on Linux - read an article how to do it.
"show ip route" that command does not exist in LiSA
Hi
when i want to run
"/usr/local/bin/qemu -m 512 -boot c -hda lisa-2.0.2-centos-6.3.img -serial telnet:127.0.0.1:3000,server,nowait
"
error: "qemu-system-i386: -serial telnet:127.0.0.1:3000,server,nowait: address resolution failed for 127.0.0.1:3000: Address family for hostname not supported
chardev: opening backend "socket" failed
qemu: could not connect serial device to character backend 'telnet:127.0.0.1:3000,server,nowait'
"
please help me
tnx
Can you ping IP address 127.0.0.1 from your computer?
Any difference if you substitute 127.0.0.1 with IP address configured on your Ethernet interface?
Have you tried to disable firewall?
hi
thanks brezular
i run telnet 127.0.0.1 3000
and log in
where Delete temporary files and command history?
part 14 and 15 very Ambiguous for me
please Explain more
tnx
Part 14 - This step is only needed if you have built LiSa Qemu image by yourself and you want to delete command history. Otherwise you can skip it. LiSa Qemu image can be dowloaded here.
Part 15 - Those are GNS3 Qemu guest settings. If you do not use GNS3, skip it.
hi
where enter
S(config)# interface Ethernet 0
S(config-if)#exit
?
swcli not found interface Ethernet 0!
If you type the command /sbin/ifconfig in Linux CLI are they any interfaces presented?
hi Brezula
How to run Linux Multilayer switch – LiSA on evaluation board or a single board computer?
Thanks
it depends on you needs.
i just want run LiSA on evaluation board or a single board computer for test.
no important.
thanks
Dear Friend
I am not linux expert and tried to the Lisa on Virtual box but cant configure properly to run , As i opened the ethernet configuration file but there is Loopback Adapter , not mentioned other lan card. kindly can anyone make video tutorial from beginning to End. I have to give ccnp paper next month but couldn't alot of Labs.
Is anyone else having issues with ping?
localhost.localdomain#ping 10.0.10.2
^
% Invalid input detected at '^' marker.